게시글 수정과 삭제에 대해 다루기 전에 게시글에 포함될 댓글 출력, 삭제에 대해서 먼저 작업해보고자 한다. 그러기에 앞서서 댓글은 게시글에 포함되는지 여부를 생각해봐야 한다. 게시글과 그에 포함될 link 정보는 N:1 연관 관계로 구성했지만, 댓글은 어떻게 해야할까?
같은 게시글 조회 페이지에 있지만, 댓글을 작성하고 수정하고 삭제하는 것은 게시글 자체의 수정과는 전혀 상관 없는 내용이다. 물론 게시글을 삭제하게 된다면 그 하위에 있는 댓글도 삭제되는 것이 옳지만, 댓글을 작성하고 수정한다고 게시글 자체를 수정하는 것은 옳지 않아보인다.
사전 작업
기존 국비 과정에서의 프로젝트 댓글 구현을 위해서 comment table에 target number와 group number를 setting 했었다. Target number는 댓글이 작성된 게시글의 번호를, group number는 댓글이 작성된 댓글의 번호를 갖도록 했다. 당시에는 oracle DB를 사용하고 있었는데, comment data를 insert 할 때 해당 댓글이 대댓글이 아닌 경우 comment_id와 group number를 같도록 sequence의 nextval 기능을 활용했다.
그런데 MySQL은 sequence를 지원하지 않는다고 한다. 현재는 일반 댓글의 경우 comment_id는 generate type IDENTITY 로 자동으로 insert 되지만, group number는 insert 되지 않는다. 어떻게 작업할지 고민했고, 다음 두 가지 방식을 도출했다.
- Comment_id data를 가지고 insert 후, group number를 가지고 update
- MySQL에서 sequence를 모방한 procedure(프로시져) 를 생성하고, @Query annotation과 함께 활용
첫 번째 방법은 굉장히 간단하다. 그냥 comment table에 entity를 save해서 insert하고, group number를 setting 해서 다시 save 하여 update하는 방식이다. Primary key는 generate type IDENTITY로 설정하여, entity data가 table에 insert 되고 난 후에서야 그 값을 조회해볼 수 있으므로 해당 값을 다른 column에도 insert 하고 싶다면 update를 해야하는 것이다.
두 번째 방법은 entity의 data를 insert 하기 전에 한 번에 setting 하고 싶어서 알아보는 중에 한 블로그에서 발견했다.1 해당 블로그에서는 sequence를 모방하는 방법을 소개하고 있다. 모방하기 위한 절차는 다음과 같다.
- Sequence로 사용할 table 만들기
- Sequence를 생성할 procedure 만들기
- 생성한 sequence의 next value를 가져오는 function 만들기
- Procedure로 sequence 생성
- Sequence에 대한 nextval function 사용
Sequence로 사용할 table 만들기
create table sequences
(
    name varchar(32) primary key,
    currval bigint unsigned
)
engine = InnoDB
Sequence로 사용할 table을 만들었다. Column은 name과 currval 두 개이며, name에는 sequence 각각의 이름이 들어가고 currval은 sequence의 current value 가 들어간다. Currval column에 작성한 unsigned는 부호(sign)가 없다는 의미로 data가 절대 음수가 되지 않을 경우 사용하는데, 기존의 range가 -9223372036854775808 ~ 9223372036854775807 였다면 부호가 없기 때문에 0 ~ 18446744073709551615 의 range로 바뀐다.
Error Code: 1175. You are using safe update mode and you tried to update a table without a WHERE that uses a KEY column.
 To disable safe mode, toggle the option in Preferences -> SQL Editor and reconnect.	0.016 sec
만약 primary key를 선언한 column이 없다면 procedure를 만들고 call 할 시점에 위와 같은 에러 코드와 메시지를 볼 수도 있다. Safe update mode를 사용하고 있는데, key column을 사용하는 where 절 없이 table을 update하려고 했을 때 발생하는 에러이다. 방법은 safe mode를 해제하거나, update를 위한 where 절에 key를 부여하는 것이다.
Safe mode란 한 번에 여러 row를 update 하거나 delete하는 것을 막는 option이라고 한다.2 만약 safe mode를 disable 시키고 싶다면 MySQL workbench의 상단 Edit tab > Preferences > 좌측 SQL Editor tab 항목의 가장 하단의 Safe Updates 해제 의 과정을 거치면 된다. 필자의 경우는 중복되지 않을 name column을 primary key로 설정하였다.
Sequence를 생성할 procedure 만들기
delimiter $$
    create procedure `create_sequence` (in the_name text)
    modifies sql data
    deterministic
    begin
        delete from sequences where name = the_name;
        insert into sequences values(the_name, 0);
    end
create_sequence 라는 이름의 procedure를 생성한다. 이때 procedure란 사전적으로 '절차, 방법' 을 의미하며, 생성할 procedure의 이름은 back tick으로 감싸며 'in' 으로 procedure에 sequences table의 name column에 들어갈 값을 전달받는다. 만약 동일한 String의 column이 존재한다면 해당 sequence를 지우고 새로 만들도록 한다.
몇 가지 내용을 살펴보고 가겠다.
- delimiter : 사전적으로 '구획 문자' 의 의미인데, javascript나 java에서 코드 한 줄의 마지막에 사용하는 세미 콜론 ';' 과 같이 문법의 끝을 나타내는 것이다. Procedure를 정의할 때 내부에 문법의 끝으로 세미 콜론 ; 를 사용했기 때문에, 그것과의 구분을 위해 작성한 부분이라고 하는데, procedure 정의에 필수적인 내용은 아니라고 한다.3
- modifies sql data : Data를 수정하는 sql 문이 존재함을 명시한다.
- deterministic : 컴퓨터 용어로 '같은 입력에 대하여 같은 출력이 행해지는 성질' 을 의미하며, 결정성이라고 번역한다.
- begin / end : Procedure의 시작과 끝을 명시한다.
생성한 sequence의 next value를 가져오는 function 만들기
delimiter $$
    create function `nextval` (the_name varchar(32))
    returns bigint unsigned
    modifies sql data
    deterministic
    begin
        declare ret bigint unsigned;
        update sequences set currval = currval + 1 where name = the_name;
        select currval into ret from sequences where name = the_name limit 1;
        return ret;
    end
Oracle의 sequence.nextval 의 nextval 역할을 하는 function을 만들었다. 이름은 동일하게 했으며, 사용할 sequence의 name을 넘겨받아 해당 name의 column의 current value를 1 올리고 그 값을 return 하도록 정의했다. Function 내부에서 select 되는 data의 수는 어차피 1개이므로 limit 이후는 사실 필요가 없긴 하다.
- returns : 생성한 function이 return 할 값의 type을 명시한다.
- declare : return 할 variable을 선언한다.
Procedure로 sequence 생성
call create_sequence("test");생성하고자 하는 이름의 sequence를 만들었던 procedure를 통해 생성한다.
Sequence에 대한 nextval function 사용
select nextval("test") from dual;nextval function을 사용할 sequence name을 명시하여 sequence의 next value를 가져온다.
CommentRepository.java
    @Query(value = "select nextval('comment') from dual", nativeQuery = true)
    int getSequenceValue();
위의 nextval function을 사용한 query가 동작하도록 하는 method를 CommentRepository interface에 @Query annotation과 함께 작성했다. @Query annotation은 해당 method가 호출되었을 때 동작할 query문을 직접 작성하기 위해 선언하는데, 그 value 속성에 동작할 query문을 작성한다.
Validation falied for query for method public abstact ~ blah ~ blah만약 nativeQuery를 true로 하지 않으면 위와 같은 에러 메시지를 확인하게 된다. Native Query란 글자 그대로 native한 query를 말한다. 이 옵션을 true로 해두면 영속 컨테이너가 이 SQL문을 JPQL이 아닌 일반 SQL로 인지할 수 있도록 해준다고 한다.4 이 내용은 지금 당장은 와닿지 않는 내용이나, JPA 관련 강의를 마저 듣는다면 좀더 와닿을 것으로 예상해본다.
그래도 간단히라도 무엇인지 파악하는 것에 도움이 된 블로그를 기록해둔다.5 해당 블로그에서는 JPQL(Java Persistence Query Language)을 다음과 같이 설명한다
- JPA는 SQL을 추상화 한 JPQL이라는 객체 지향 query language를 제공한다.
기존의 SQL이 database의 table을 대상으로 query를 작성한다면, JPQL은 entity를 대상으로 작성한다. - JPA는 entity를 중심으로 동작하기 때문에 SQL을 사용하지 않는다.
- 따라서 table을 조회할 때도 table을 기준으로 하는 것이 아니라 entity를 기준으로 해야한다.
- 만약 Recipe table의 data를 조회하고자 한다면 'select r from Recipe r' 과 같은 방식으로 작성하며, 이때 Recipe는 table name이 아니라 entity이다.
- 하지만 JPQL이 아닌 SQL문을 사용하려고 한다면 nativeQuery 속성을 true로 해야만 JPA가 해당 query문을 일반 SQL로 인지할 수 있도록 하는 것이다.
작업
content.html
<!DOCTYPE html>
<html lang="en"
      xmlns:th="http://www.thymeleaf.org"
      xmlns:sec="http://www.thymeleaf.org/extras/spring-security">
<head>
    <meta charset="UTF-8">
    <title>write.html</title>
    <meta name="_csrf" th:content="${_csrf.token}">
    <meta name="_csrf_header" th:content="${_csrf.headerName}">
</head>
<link rel="stylesheet" href="/lib/css/bootstrap.css">
<link rel="stylesheet" href="/lib/css/contentform.css">
<style>
    .search_form{
      display:inline;
    }
    a{
        text-decoration: none;
    }
    .reply{
        margin-top: 10px;
    }
</style>
<body>
<div class="container">
    <div th:replace="fragments/navibar :: navi"></div>
    <div class="content">
        <h2 class="row col-8">게시글</h2>
        <div class="row col-8">
            <div th:if="${recipe.writer} == ${#authentication.name}">
                <a th:href="@{/user/delete/{contentId}(contentId = ${recipe.contentId})}"
                   class="btn btn-light float-end">삭제</a>
                <a th:href="@{/user/content_updateform/{contentId}(contentId = ${recipe.contentId})}"
                   class="btn btn-light float-end">수정</a>
            </div>
        </div>
        <div class="row col-8">
            <label for="title">제목</label>
            <div class="col">
                <input type="text" id="title" name="title" class="form-control"
                       style="background-color: white;" th:value="${recipe.title}" disabled>
            </div>
        </div>
        <div class="row col-8">
            <label for="writer">작성자</label>
            <div class="col">
                <input type="text" id="writer" name="" class="form-control"
                       style="background-color: white;" th:value="${recipe.writer}" disabled>
            </div>
        </div>
        <div class="row col-8">
            <label for="regDate">작성 일시</label>
            <div class="col">
                <input type="text" id="regDate" name="" class="form-control"
                       style="background-color: white;" th:value="${recipe.regDate}" disabled>
            </div>
            <label for="modDate">수정 일시</label>
            <div class="col">
                <input type="text" id="modDate" name="" class="form-control"
                       style="background-color: white;" th:value="${recipe.modDate}"disabled>
            </div>
        </div>
        <div class="row col-8">
            <label for="content">내용</label>
            <div class="col-8 input">
                <textarea name="content" id="content" cols="30" rows="10"
                          class="form-control" style="height: 240px;background-color: white;"
                          th:text="${recipe.content}"disabled></textarea>
            </div>
            <div class="col-4" style="padding-left: 35px;">
                <a href="#" data-bs-toggle="modal" data-bs-target="#exampleModal">
                    <img src="/lib/image/no_image.png" alt="" id="image"
                         name="image" style="width: 240px; height: 240px;">
                </a>
                <div class="row">
                <div class="col">
                    <span>조회수 :
                        <span th:text="${recipe.viewCount}"></span>
                    </span>
                </div>
                <div class="col">
                    <span>좋아요 :
                        <span th:text="${recipe.likeCount}"></span>
                    </span>
                </div>
                </div>
            </div>
        </div>
        <div class="row col-8" style="float: none; margin:0 auto;">
            <label for="" style="float: none; margin:0 auto;">카테고리</label>
        </div>
        <div class="row col-8">
            <label for="link" style="width: 150px;">참고 링크</label>
            <ul id="link">
                <li th:each="link : ${recipe.link}">
                    <a href="" class="refLink form-control" th:text="${link}"></a>
                </li>
            </ul>
        </div>
    </div>
    <div class="comment" id="commentDiv">
        <h2 class="row col-8">댓글</h2>
        <div class="row col-8" th:each="comment : ${commentList}">
            <div th:if="${comment.groupId} == ${comment.commentId}">
                <div th:replace="fragments/comment :: normal(${comment})"></div>
            </div>
            <div th:if="${comment.groupId} != ${comment.commentId}">
                <div th:replace="fragments/comment :: reply(${comment})"></div>
            </div>
        </div>
    </div>
    <div class="row col-8 reply" sec:authorize="isAuthenticated()">
        <form class="row" action="/user/add-comment" id="commentForm" method="post">
            <svg xmlns="http://www.w3.org/2000/svg" width="29" height="29"
                 fill="currentColor" class="bi bi-arrow-return-right col-1" viewBox="0 0 16 16"
                 id="replyIcon" style="display: none;">
                <path fill-rule="evenodd" d="M1.5 1.5A.5.5 0 0 0 1 2v4.8a2.5 2.5 0 0 0 2.5
                2.5h9.793l-3.347 3.346a.5.5 0 0 0 .708.708l4.2-4.2a.5.5 0 0 0 0-.708l-4-4a.5.5
                0 0 0-.708.708L13.293 8.3H3.5A1.5 1.5 0 0 1 2 6.8V2a.5.5 0 0 0-.5-.5z"/>
            </svg>
            <input type="text" id="comment" name="comment" class="form-control col" required>
            <input type="hidden" name="targetId" th:value="${recipe.contentId}">
            <input type="hidden" name="groupId" id="groupId">
            <button class="btn btn-primary float-end col-1" type="submit">작성</button>
            <button class="btn btn-light float-end col-1" id="replyCancel">취소</button>
        </form>
    </div>
</div>
<!-- Modal -->
<div class="modal fade" id="exampleModal" tabindex="-1"
     aria-labelledby="exampleModalLabel" aria-hidden="true">
    <div class="modal-dialog modal-dialog-centered">
        <div class="modal-content">
            <div class="modal-header">
                <h1 class="modal-title fs-5" id="exampleModalLabel" th:text="${recipe.title}">Modal title</h1>
                <button type="button" class="btn-close" data-bs-dismiss="modal" aria-label="Close"></button>
            </div>
            <img src="/lib/image/no_image.png" alt="">
        </div>
    </div>
</div>
</body>
<script src="/lib/js/bootstrap.bundle.js"></script>
<script th:inline="javascript" src="/app/content.js"></script>
</html>
Thymeleaf의 data binding 기능만을 활용하고 있어서 쓸데없이 길다. 댓글 부분을 조금 줄여봤지만 그래도 길다.
comment.html
<!DOCTYPE html>
<html lang="en"
      xmlns:th="http://www.thymeleaf.org"
      xmlns:sec="http://www.thymeleaf.org/extras/spring-security">
<div th:fragment="normal(comment)"
     th:class="|row reply groupId${comment.groupId}|"
     th:id="|normalComment${comment.commentId}|">
    <div class="flex-row">
        <span th:text="${comment.writer}"></span>
        <span th:text="|/ ${comment.regDate}|"></span>
    </div>
    <input type="text" class="form-control col"
           style="background-color: white;" th:value="${comment.comment}" disabled>
    <button th:data-num="${comment.groupId}"
            th:data-text="${comment.writer}"
            sec:authorize="isAuthenticated()"
            class="btn btn-light float-end col-1 replyBtn" type="submit"
            style="width: 70px;">답글</button>
    <button th:if="${comment.writer} == ${#authentication.name}"
            class="btn btn-light float-end col-1 deleteBtn" type="submit"
            style="width: 70px;">삭제</button>
</div>
<div th:fragment="reply(comment)"
     th:class="|row reply groupId${comment.groupId}|"
     th:id="|replyComment${comment.commentId}|">
    <svg xmlns="http://www.w3.org/2000/svg" width="29" height="29"
         fill="currentColor" class="bi bi-arrow-return-right col-1" viewBox="0 0 16 16"
         style="margin-top: 25px;">
        <path fill-rule="evenodd" d="M1.5 1.5A.5.5 0 0 0 1 2v4.8a2.5 2.5 0 0 0 2.5
                    2.5h9.793l-3.347 3.346a.5.5 0 0 0 .708.708l4.2-4.2a.5.5 0 0 0 0-.708l-4-4a.5.5
                    0 0 0-.708.708L13.293 8.3H3.5A1.5 1.5 0 0 1 2 6.8V2a.5.5 0 0 0-.5-.5z"/>
    </svg>
    <div class="row col" style="padding: 0px;">
        <div class="flex-row">
            <span th:text="${comment.writer}"></span>
            <span th:text="|/ ${comment.regDate}|"></span>
        </div>
        <input type="text" id="" name="" class="form-control col"
               style="background-color: white;" th:value="${comment.comment}" disabled>
        <button th:data-num="${comment.groupId}"
                th:data-text="${comment.writer}"
                sec:authorize="isAuthenticated()"
                class="btn btn-light float-end col-1 replyBtn" type="submit"
                style="width: 70px;">답글</button>
        <button th:if="${comment.writer} == ${#authentication.name}"
                class="btn btn-light float-end col-1" type="submit"
                style="width: 70px;">삭제</button>
    </div>
</div>
</html>
댓글 fragment 로 작성한 내용이다.
comment.js
    // 답글 클릭 시 focus 이동 및 동작
    document.querySelectorAll(".replyBtn").forEach(tmp => {
        tmp.addEventListener("click", function(e){
            document.querySelector("#replyIcon").style.display = "block";
            document.querySelector("#groupId").value = this.dataset.num;
            document.querySelector("#comment").focus();
            document.querySelector("#comment").value = "@" + this.dataset.text + " ";
        });
    });
    // 취소 클릭 시
    document.querySelector("#replyCancel").addEventListener("click", function(e){
        e.preventDefault();

        document.querySelector("#replyIcon").style.display = "none";
        document.querySelector("#groupId").value = "";
        document.querySelector("#comment").value = "";
    });

    // 게시글 작성 form submit
    document.querySelector("#commentForm").addEventListener("submit", function(e){
        e.preventDefault();

        var url = document.querySelector("#commentForm").action;
        var formData = new FormData(this);

        var token = document.querySelector("meta[name=_csrf]").content;
        var header = document.querySelector("meta[name=_csrf_header]").content;

        var promise = fetch(url, {
            method: "POST",
            headers: {
                "header": header,
                "X-Requested-With": "XMLHttpRequest",
                "X-CSRF-Token": token
            },
            body: formData
        });

        promise.then(function(response){
            return response.json();
        }).then(function(data){
            if(data.beAdded){
                location.reload();
            } else {
                alert("댓글을 추가할 수 없습니다. 문제가 반복된다면 문의 바랍니다.");
            }
        });
    });
Data를 server로 전달하는 것은 동일하게 ajax fetch를 활용했다. 거기에 더해서 답글 버튼을 눌렀을 때나, 취소 버튼을 눌렀을 때의 간단한 동작을 작성했다. Server로부터의 응답 여부에 따라 다르게 화면 전환 없이 댓글을 추가하고자 했는데, thymeleaf template을 동적으로 추가하는 방안을 찾지 못해서 단순히 새로고침하도록 두었다.
CommentController.java
package com.example.recipository.controller;

import com.example.recipository.domain.SpUser;
import com.example.recipository.dto.CommentDto;
import com.example.recipository.service.CommentServiceImpl;
import org.springframework.security.access.prepost.PreAuthorize;
import org.springframework.security.core.annotation.AuthenticationPrincipal;
import org.springframework.web.bind.annotation.PostMapping;
import org.springframework.web.bind.annotation.RestController;

@RestController
public class CommentController {
    private final CommentServiceImpl commentService;

    public CommentController(CommentServiceImpl commentService) {
        this.commentService = commentService;
    }

    // 댓글 작성 통합
    @PostMapping("/user/add-comment")
    @PreAuthorize("hasAuthority('ROLE_USER')")
    public ResponseEntity<Object> addComment(CommentDto commentDto,
                                             @AuthenticationPrincipal SpUser spUser){

        // Authentication principal인 UserDetails 에서 사용자 정보를 받아옴
        String writer = spUser.getUsername();

        // 댓글을 추가하는 service logic을 통과한 후 ResponseEntity로 return
        Map<String, Object> map = commentService.addComment(commentDto, writer);

        return ResponseEntity.ok().body(map);
    }
}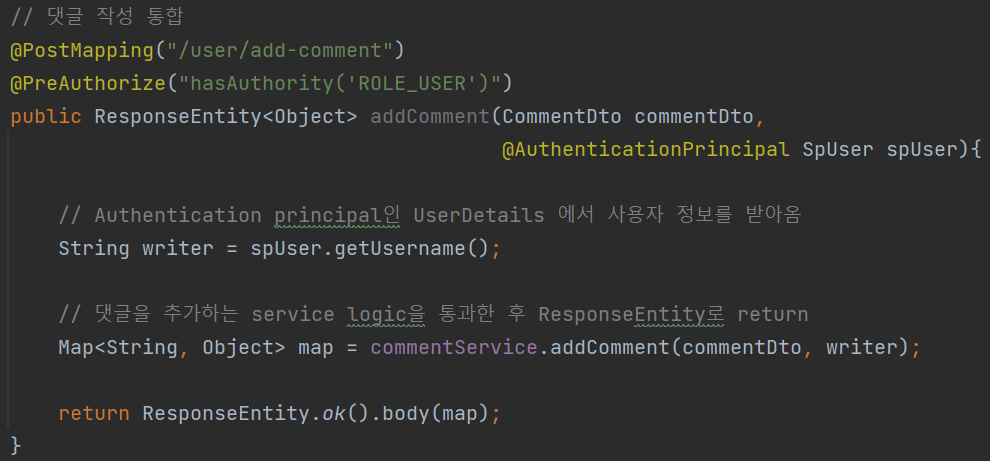
Client로부터의 댓글 추가 request에 동작하는 controller의 method이다. Client에서 작성한 댓글의 내용과 댓글이 작성된 게시글의 번호를 CommentDto로 받아서 Service 단으로 넘겨준다. 그리고 service logic을 통과해서 넘겨받은 댓글 추가 logic의 성공 여부과, 그 data를 Map에 담고, 그것을 ResponseEntity에 담아서 client로 return 했다.
(이 게시글 작성은 html이 앞에 왔지만, 작업은 Controller를 먼저 했다. 사실 이곳에서 return 한 commentDto를 통해 화면 깜빡임 없이 동적으로 새로 작성한 댓글을 보이도록 하려고 했으나, 앞서 작성한대로 하나하나 createElement 하고 그것들을 조합하는 것 외의 방안을 찾지 못해서 성공시에는 단순히 새로고침 하도록 했다.)
CommentDto.java
package com.example.recipository.dto;

import com.example.recipository.domain.Comment;
import com.example.recipository.domain.Recipe;
import lombok.AllArgsConstructor;
import lombok.Builder;
import lombok.Data;
import lombok.NoArgsConstructor;

@Data
@AllArgsConstructor
@NoArgsConstructor
@Builder
public class CommentDto {
    private Long commentId;
    private String writer;
    private String comment;
    private Long targetId;
    private Long groupId;
    private String regDate;

    public Comment toEntity(){
        Recipe recipe = Recipe.builder()
                .contentId(targetId)
                .build();

        return Comment.builder()
                .commentId(this.commentId)
                .writer(this.writer)
                .comment(this.comment)
                .recipe(recipe)
                .groupId(this.groupId)
                .build();
    }
}
이때 request와 respone에 사용된 CommentDto이다. 사실은 request에 저 모든 field가 필요하지는 않는다. 바로 다음 작업은 댓글을 삭제하는 작업인데, 그것에 앞서서 dto와 entity를 구분하는 이유와 dto 또한 request와 response로 나누는 이유를 살펴보고 class를 고칠 생각이다.
CommentServiceImpl.java
package com.example.recipository.service;

import com.example.recipository.domain.Comment;
import com.example.recipository.dto.CommentDto;
import com.example.recipository.repository.CommentRepository;
import org.springframework.stereotype.Service;

import java.util.HashMap;
import java.util.Map;

@Service
public class CommentServiceImpl implements CommentService{
    private final CommentRepository commentRepository;

    public CommentServiceImpl(CommentRepository commentRepository) {
        this.commentRepository = commentRepository;
    }

    // 댓글을 추가하는 service logic
    @Override
    public Map<String, Object> addComment(CommentDto commentDto, String writer) {
        Map<String, Object> map = new HashMap<String, Object>();
        try {
            Long id = commentRepository.getSequenceValue();
            commentDto.setCommentId(id);
            commentDto.setWriter(writer);
            // Dto의 groupId가 null 인 경우는 글에 대한 댓글
            // 따라서 댓글의 id를 groupId 에도 넣어줌
            if (commentDto.getGroupId() == null) {
                commentDto.setGroupId(id);
            }
            Comment comment = commentDto.toEntity();

            // Comment entity에 담긴 data를 repository에 save하고
            commentRepository.save(comment);

            // 성공 여부와 comment data가 담긴 Dto를 map에 담아 controller로 전달
            map.put("beAdded", true);
            map.put("commentDto", commentDto);

            return map;
        } catch (Exception e) {
            // 에러로 인한 실패 시에는 실패 정보만을 담아 전달
            map.put("beAdded", false);

            return map;
        }
    }
}
작성한 댓글 정보를 저장하는 service logic이다. Logic을 try ~ catch로 묶었는데, 위 이미지는 그 중에 try 안쪽의 내용이다. 댓글 정보를 추가하는 경우는 다음의 두 가지로 구분할 수 있다.
- 게시글 자체에 대한 댓글
- 게시글에 작성된 댓글에 대한 댓글(a.k.a. 대댓글)
위 두 가지 경우의 가장 큰 차이점은 client로부터 groupId data를 전달받는가에 대한 여부이다. GroupId는 댓글을 group으로 묶기 위한 값으로, DB에서 댓글의 data를 출력할 때 sort하는 과정에서 댓글과 그 대댓글을 묶기 위한 것이다. 이 값이 존재하는지에 대한 여부로 구분하며, 없는 경우에는 게시글에 대한 직접적인 댓글로 하여 자기 자신의 commentId를 groupId의 값으로 넣어 DB에 data를 save 하도록 했다. 이때의 commentId는 사전에 작업했던 MqSQL에서 sequence를 흉내냈던 그것을 활용했다.
Comment.java
package com.example.recipository.domain;

import com.example.recipository.dto.CommentDto;
import lombok.AllArgsConstructor;
import lombok.Builder;
import lombok.Getter;
import lombok.NoArgsConstructor;

import javax.persistence.*;
import java.time.format.DateTimeFormatter;

@Getter
@AllArgsConstructor
@NoArgsConstructor
@Table(name = "comment")
@Entity
@Builder
public class Comment extends BaseTime {
    @Id
    private Long commentId;
    private String writer;
    private String comment;
    @ManyToOne(fetch = FetchType.LAZY, cascade = CascadeType.REMOVE)
    @JoinColumn(name = "target_id")
    private Recipe recipe;
    private Long groupId;

    public CommentDto toDto(){
        return CommentDto.builder()
                .commentId(this.commentId)
                .writer(this.writer)
                .comment(this.comment)
                .groupId(this.groupId)
                .regDate(super.getRegDate().format(DateTimeFormatter.ofPattern("yyyy-MM-dd HH:mm:ss")))
                .build();
    }
}
Recipe.java
    @OneToMany(mappedBy = "recipe", fetch = FetchType.LAZY)
    private List<Comment> commentList;
게시글에 대한 Recipe Entity와 그 안에 포함된 댓글에 대한 Comment Entity는 1:N의 관계라고 할 수 있다. 그리고 게시글의 data를 불러올 때는 그것에 작성된 댓글의 정보를 함께 불러와야 한다. 이는 Link의 경우와 마찬가지이긴 하다. 하지만 그때는 굳이 양방향으로 관계를 맺지 않았는데, 이번에는 양방향 연관 관계를 맺어서 그 차이를 보고 싶었다. 그래서 Recipe에는 @OneToMany를, Comment에는 @ManyToOne을 붙여서 관계를 형성했다.
이때 service logic에서의 Comment Entity를 save하는 것은 그 게시글인 Recipe를 저장하는 것과는 전혀 관련이 없기 때문에 cascade type을 ALL 이 아닌 REMOVE로 설정했다. 만약 ALL로 save를 하려고 한다면 다음과 같은 단계를 거치려고 한다.
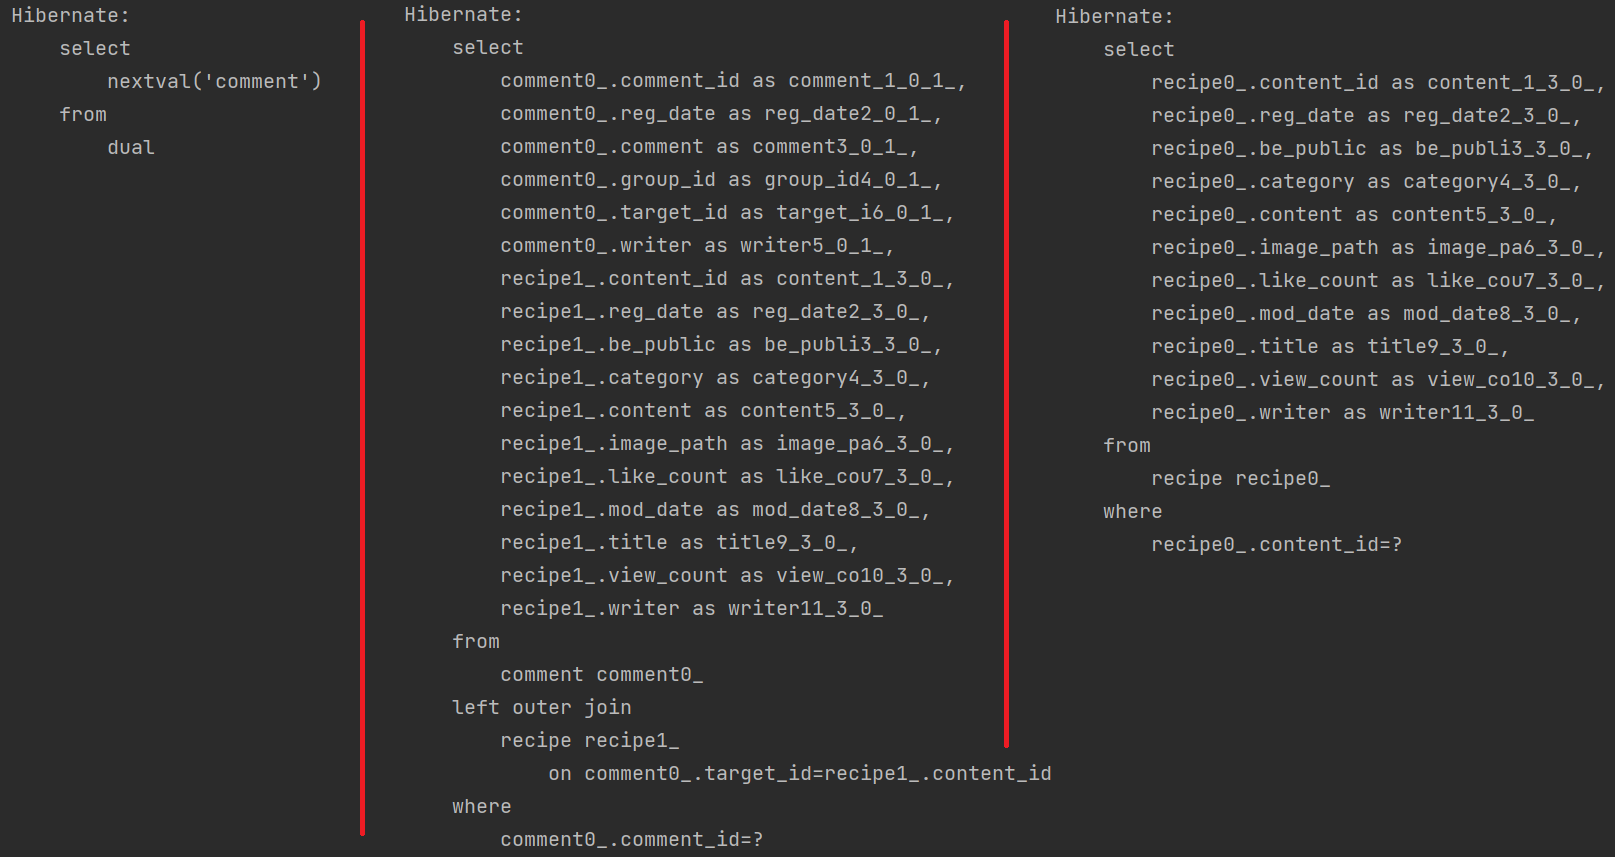
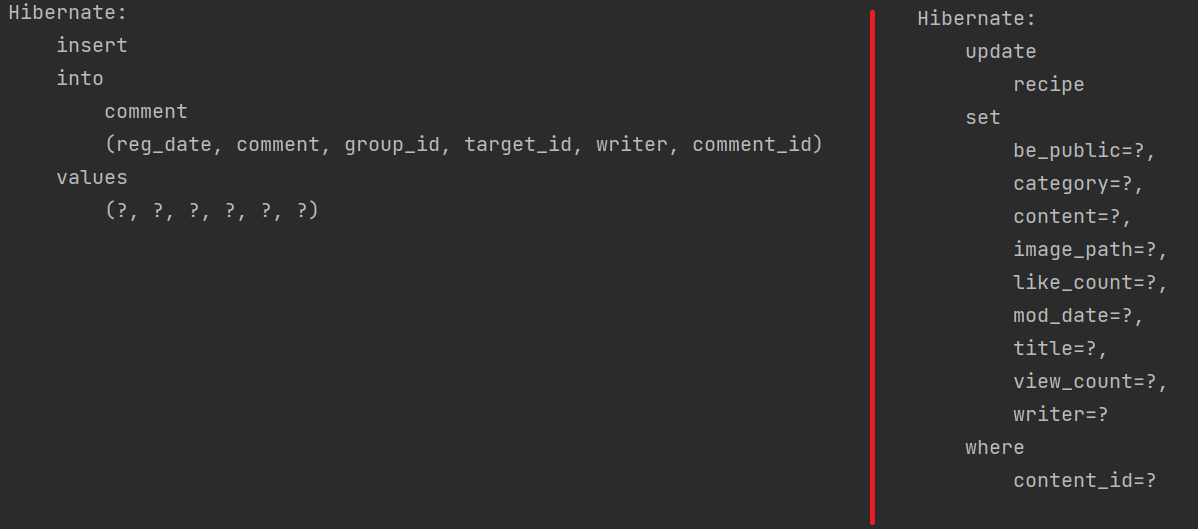
모방했던 sequence를 select 하고, comment와 recipe를 join 하여 select 한 뒤, recipe 만을 select 한다. 이어서 comment에 insert 한 뒤에 recipe에 update 하려고 한다. Sequence를 모방한 것을 제외하고는 모두 save 로 인해서 발행하는 query문인데, 이들은 원하는 바가 아니다.
이런 query 가 수행되려고 하는 이유는 cascade type이 ALL 이기 때문인데, 그 ALL 중에서도 PERSIST 때문이다. Persist는 사전적으로 '계속하다, 지속되다.' 의 의미인데, 아직은 잘 모르겠지만 '영속' 이라는 의미와 통하는 내용일 것으로 생각한다. Repository의 save method를 수행하려 한다면 해당 entity가 새로운 것인지 여부를 파악하고, 새 내용인 경우는 Entity Manager의 persist method가 동작하도록 하고 아니라면 merge method가 동작하도록 한다. 이 두 차이는 insert query와 update query를 구분한다고 할 수 있겠는데, 기존에 이미 해당 contentId의 게시글이 존재하기 때문에 Comment를 insert 하면서 그와 연결된 Recipe 또한 save 하려고 하는 것으로 추정된다.
따라서 cascade type은 ALL 이 아닌 DELETE로 해야 하며, 위 service logic에서도 Comment Entity에 대한 save 만이 이루어지는 것을 확인했다.
이미 조회에 대해서도 구현이 되었으나, 그것은 바로 이어서 작성해보겠다. 화면을 깜빡이는 것이 싫어서 너무 오랜 기간을 고민하는 바람에 너무 길어졌다. 게시글 조회에 대한 수정 사항을 잠깐 작성한 뒤, Dto와 Entity의 구분하는 것에 대해 고찰해보고 댓글을 삭제하는 작업을 진행하도록 하겠다.
Reference
'프로젝트 > Recipository' 카테고리의 다른 글
| [Dev] 22.12.16. Dto와 Entity (0) | 2022.12.16 |
|---|---|
| [Dev] 22.12.15. 게시글 조회 (+ 댓글) (0) | 2022.12.15 |
| [Dev] 22.12.09. 게시글 조회 (0) | 2022.12.09 |
| [Dev] 22.12.05. 게시글 작성 통합 (0) | 2022.12.05 |
| [Dev] 22.12.05. 로그인 사용자 정보 얻기 (0) | 2022.12.05 |


댓글